Thursday, January 15, 2009
Tuesday, January 6, 2009
Cream Puffs for dessert!
Wow, I was so proud of myself! I actually made dinner, a side vegetable (besides a can of corn or green beans) AND home-made bread! Then we ate wonderful cream puffs! I've only made them once and it was when I was like 11. For a church group activity. So, I was a little worried they wouldn't turn out. BUT WOW! They were just as simple as the lava cake last night! AND (this is the best part!) my husband LOVED them! I mean, he actually made the astonished face, followed by 'WOW! These are REALLY good!'. Oh, and he said they looked professional. That just made my whole night! Anyways, here's a picture of dinner. Thank you again Shanna for this wonderful recipe! (can be found HERE)
 Yes, that's how lame I am. I had to take one on a black plate with a bit of red in the background. I can't just take one picture! hahaha


Moving on... to dessert! Here's the strange looking dough.

Baked and filled. Ready to decorate!

I used cool whip from a can and Nesquik choc. syrup! I was going to make the chocolate drizzle from choc. chips & heavy cream. But A) I didn't want to B) I didn't want to! I'm actually glad I didn't... I LOVED the taste of this. Semi-sweet choc. would have ruined this.
 Yes, that's how lame I am. I had to take one on a black plate with a bit of red in the background. I can't just take one picture! hahaha
This recipe is courtesy of Allrecipes.com
- 2 (3.5 ounce) packages instant vanilla pudding mix
- 2 cups heavy cream
- 1 cup milk
- 1/2 cup butter
- 1 cup water
- 1/4 tsp. salt
- 1 cup all-purpose flour
- 4 eggs
- Mix together vanilla instant pudding mix, cream and milk. Cover and refrigerate to set.
- Preheat oven to 425 degrees.
- In a large pot, bring water and butter to a rolling boil. Stir in flour and salt until the mixture forms a ball. Transfer the dough to a large mixing bowl. Using a wooden spoon or stand mixer, beat in the eggs one at a time, mixing well after each. Drop by tablespoonfuls onto an ungreased baking sheet.
- Bake for 20 to 25 minutes in the preheated oven, until golden brown. Centers should be dry.
- When the shells are cool, either split and fill them with the pudding mixture, or use a pastry bag to pipe the pudding into the shells.
Monday, January 5, 2009
Molten Chocolate Cake
Courtesy of Kraft Foods & Baker's.
What more could you ask for? This is BY FAR the easiest dessert I've ever made. It didn't require a mixer, or a big bowl. (I halved the recipe, so I was able to fit all the ingredients in a cereal bowl!) I was so shocked at the ingredients and the amounts (and the lack of) some of them. Only 3 Tbsp. of flour for 2 cakes? I was suspicious. But it was pretty good! Now this isn't the BEST TASTING ever, but for the effort? Can't complain! I will definately be making this again. And it says to make it in custard cups. Yeah, like I have those! So I just baked them in said cereal bowls and it worked great!

I almost paired it with ice cream, but that's just how lazy I was tonight, folks. I think I prefer it this way anyways!

Prep Time:15 min
Total Time:30 min
Makes:8 servings, one half molten cake each
What You Need
4 squares BAKER'S Semi-Sweet Chocolate (I used choc. chips)
1/2 cup (1 stick) butter
1 cup powdered sugar
2 eggs
2 egg yolks
6 Tbsp. flour
1/2 cup thawed COOL WHIP Whipped Topping
Make It
PREHEAT oven to 425°F. Butter four 3/4-cup custard cups or soufflé dishes. Place on baking sheet.
MICROWAVE chocolate and butter in large microwaveable bowl on HIGH 1 min. or until butter is melted. Stir with wire whisk until chocolate is completely melted. Stir in sugar until well blended. Blend in eggs and egg yolks with wire whisk. Stir in flour. Divide batter among prepared custard cups.
BAKE 13 to 14 min. or until sides are firm but centers are soft. Let stand 1 min. Carefully run small knife around cakes to loosen. Invert cakes onto dessert dishes. Serve immediately, topped with whipped topping.
Kraft Kitchens Tips
How to Bake Cakes in Muffin Cups
Prepare batter as directed; pour evenly among ten paper-lined medium muffin cups. Bake at 425ºF for 10 min. or until sides are firm but centers are soft. Let stand 1 min. Makes 10 servings.
Make Ahead
Batter can be made a day ahead. Prepare batter as directed; pour into prepared custard cups. Cover with plastic wrap. Refrigerate up to 24 hours. Let stand at room temperature 1 hour before baking as directed.
What more could you ask for? This is BY FAR the easiest dessert I've ever made. It didn't require a mixer, or a big bowl. (I halved the recipe, so I was able to fit all the ingredients in a cereal bowl!) I was so shocked at the ingredients and the amounts (and the lack of) some of them. Only 3 Tbsp. of flour for 2 cakes? I was suspicious. But it was pretty good! Now this isn't the BEST TASTING ever, but for the effort? Can't complain! I will definately be making this again. And it says to make it in custard cups. Yeah, like I have those! So I just baked them in said cereal bowls and it worked great!
I almost paired it with ice cream, but that's just how lazy I was tonight, folks. I think I prefer it this way anyways!

Prep Time:15 min
Total Time:30 min
Makes:8 servings, one half molten cake each
What You Need
4 squares BAKER'S Semi-Sweet Chocolate (I used choc. chips)
1/2 cup (1 stick) butter
1 cup powdered sugar
2 eggs
2 egg yolks
6 Tbsp. flour
1/2 cup thawed COOL WHIP Whipped Topping
Make It
PREHEAT oven to 425°F. Butter four 3/4-cup custard cups or soufflé dishes. Place on baking sheet.
MICROWAVE chocolate and butter in large microwaveable bowl on HIGH 1 min. or until butter is melted. Stir with wire whisk until chocolate is completely melted. Stir in sugar until well blended. Blend in eggs and egg yolks with wire whisk. Stir in flour. Divide batter among prepared custard cups.
BAKE 13 to 14 min. or until sides are firm but centers are soft. Let stand 1 min. Carefully run small knife around cakes to loosen. Invert cakes onto dessert dishes. Serve immediately, topped with whipped topping.
Kraft Kitchens Tips
How to Bake Cakes in Muffin Cups
Prepare batter as directed; pour evenly among ten paper-lined medium muffin cups. Bake at 425ºF for 10 min. or until sides are firm but centers are soft. Let stand 1 min. Makes 10 servings.
Make Ahead
Batter can be made a day ahead. Prepare batter as directed; pour into prepared custard cups. Cover with plastic wrap. Refrigerate up to 24 hours. Let stand at room temperature 1 hour before baking as directed.
Wednesday, December 31, 2008
Marble Cookies
Here's the dough!

All ready to bake!

These are actually burned, but they looked prettier than the other ones! Again, my oven made them crunchier than I wanted. They are supposed to be cake-y. And they still were in the very center, but the outsides were crunchy. STUPID OVEN! Update: Luckily, Tupperware comes to the rescue yet again! After a day in the Tupperware, even the burned ones were pretty chewy and lost all their crunch! YAY!

Ingredients
2 cups flour
½ teaspoon baking powder
¼ teaspoon salt
½ cup light brown sugar, packed
½ cup sugar
½ cup butter, softened
1 large egg
½ cup sour cream
1 teaspoon vanilla extract
1 cup semisweet chocolate chips
Preheat oven to 300*F. In medium bowl combine flour, baking powder and salt with wire whisk. Set aside. Combine sugars in a large bowl using and electric mixer set at medium speed. Add butter and beat until batter is grainy. Add egg, sour cream and vanilla, and beat at medium speed until light and flufffy. Scrape bowl. Add the flour mixture, and blend at low speed until just combined. Place chocolate chips in double boiler over hot but not boiling water. Stir constantly until melted. Or, place chips in a microwave proof bowl and zap on high, stirring every 20 seconds until melted. Cool chocolate for a few minutes and pour over cookie batter. Using a wooden spoon or rubber spatula, lightly fold melted chocolate int the dough. Do not mix chocolate completely into dough. Drop by rounded tablespoons, 2 inches apart, onto ungreased cookie sheets. Bake 23-25 minutes. Do not brown. Quickly transfer cookies to a cool surface.
Sunday, December 28, 2008
Quiet cookies
So these are my cookies thanks to my SATANIC oven! I had even lowered the temp. by 25 degrees (like I always have to) and baked them for 4 min. instead of 8. And this is still what I got! Oh well, that's why I do a test batch because I don't trust my oven. ;)

That's better!

Finished product, after dipping

Meh... They were alright. Nothing special. I honestly didn't even WANT to make these, but I was dying to make some cookies. Of course my daughter was napping and if I make even a peep (and I guarantee my KitchenAid is more than a peep) she'd wake up. So I made something that required no mixing. Glad I did, so I can check it of my 'to make' list, but honestly wouldn't ever make them again.

Oh, and yesterday I wanted some bon-bons and so I dunked some balls of Breyers into Almond Bark. Man, I love Almond Bark. I cannot seem to get enough of the stuff!
Friday, December 26, 2008
Ready... Set... BAKE!!!
I have decided to join a blogging group. Of bakers!!! It's called "Daring Bakers" and once a month we receive a challenge. The challenge is to be completed in that month's time and everyone blogs their pictures and experience on the same day. I will be receiving my first challenge the beginning of January. I am soooooooo excited! And terrified. Yeah, that too! These are not 'oatmeal cookie' challenges. One member shared her experience with her first challenge of Daring Bakers. The recipe was 9 PAGES LONG! This is so thrilling to me: to challenge myself. To see just how good I can become. Each time I try, I learn. Each time I fail, I learn. Each time I succeed, I learn. Thanks to Melanie, I have more confidence based on success! I will be posting all of my daring baker challenges on this site (since it has to be on a public blog). But I will also be including other pictures and recipes, too. I might be lazy and just link the recipe instead of typing out each one. BUT I want somewhere I can just post the pictures of my food if I feel like it. Anyways, here's the pictures!

So these are my second attempt at home-made rolls. Not bad, not bad. Still lumpier looking that I'd like!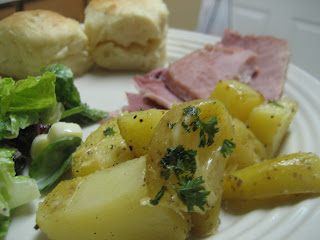
This was our Christmas Eve dinner with Tyler's parents and his brother (and kids). Looking at the pictures, it looks like such a small meal. But it took a lot of work!
(Potatoes courtesy of ForTheLoveofCooking)
(with the desserts too)

Here is dessert #1. A chocolate/caramel cheesecake from MyKitchenCafe. My very first cheesecake! I am hooked... I was sooooooo pleased with the presentation of this cheesecake. It was extremely rich with a wonderful texture. It was a bit bitter for my taste (because of the bittersweet chocolate, of course!). But I think it tasted 'off' because I had it in my head that it would taste differently. Make sense? Still....
Look how pretty!!!!!!!
 Christmas day apple pie!
Don't know why it looks so Nasty! It wasn't bad.(except for our stupid microwave... I cooked the apples for almost HALF the time it said, and they were still over-cooked.. Well, according to me! My MIL like it!)

My. Very. First. Loaf. Of bread! EVER (besides banana bread, zucchini bread, you know...) And I got to use my new, shiny, red (SEXY) KitchenAid! The dough stuck to the towel while rising (despite the fact that the towel was wet) and the top kind of collapsed in on itself. Oh well!

Second loaf. A little better. Still pretty crunchy on the outside. And this time I even used a bowl of water in the oven with it. It helped with the browning of the top, but not really with the 'moist-ness' of the bread. I might have over-floured my dough.

Christmas morning cinnamon rolls! (recipe courtesy of MyKitchenCafe
This was my prettiest one: I HAD to get a 'before icing' picture!

I couldn't believe I didn't screw them up!!!!

So these are my second attempt at home-made rolls. Not bad, not bad. Still lumpier looking that I'd like!

This was our Christmas Eve dinner with Tyler's parents and his brother (and kids). Looking at the pictures, it looks like such a small meal. But it took a lot of work!
(Potatoes courtesy of ForTheLoveofCooking)
(with the desserts too)

Here is dessert #1. A chocolate/caramel cheesecake from MyKitchenCafe. My very first cheesecake! I am hooked... I was sooooooo pleased with the presentation of this cheesecake. It was extremely rich with a wonderful texture. It was a bit bitter for my taste (because of the bittersweet chocolate, of course!). But I think it tasted 'off' because I had it in my head that it would taste differently. Make sense? Still....

Look how pretty!!!!!!!
 Christmas day apple pie!
Don't know why it looks so Nasty! It wasn't bad.(except for our stupid microwave... I cooked the apples for almost HALF the time it said, and they were still over-cooked.. Well, according to me! My MIL like it!)

My. Very. First. Loaf. Of bread! EVER (besides banana bread, zucchini bread, you know...) And I got to use my new, shiny, red (SEXY) KitchenAid! The dough stuck to the towel while rising (despite the fact that the towel was wet) and the top kind of collapsed in on itself. Oh well!

Second loaf. A little better. Still pretty crunchy on the outside. And this time I even used a bowl of water in the oven with it. It helped with the browning of the top, but not really with the 'moist-ness' of the bread. I might have over-floured my dough.

Christmas morning cinnamon rolls! (recipe courtesy of MyKitchenCafe
This was my prettiest one: I HAD to get a 'before icing' picture!

I couldn't believe I didn't screw them up!!!!
Tuesday, December 16, 2008
Subscribe to:
Posts (Atom)
